Beginner’s Guide to Using Azure CLI
In this lab, I install the Azure CLI, connect to my Azure account, create a virtual network, deploy a Windows Server VM, connect securely using Bastion and finally explore some essential CLI commands, all without touching the Azure portal.

The Goal
To introduce beginners to the Azure Command Line Interface (CLI)—a powerful tool for managing Azure resources directly from the terminal. Whether scripting, troubleshooting, or automating, this guide helps you get started confidently.
The Lab
This lab is also available on YouTube
The lab runs through the following:
- Installing Azure CLI.
- Logging into your Azure account.
- Setting up a virtual network, Windows Server VM, and accessing the VM securely using Azure Bastion.
- Running useful Azure CLI commands to explore and manage resources.
The Why
The Azure portal is a great guided way to setup resources in Azure to build infrastructure. Point and click works well and is an easy way to get things done, however it doesn't scale very well, meaning spinning up many resources would take an unreasonable amount of time and is liable to user error.
Azure CLI is a command line utility that connects to your Azure tenant and accepts text commands that do the same job as clicking around in the Azure portal. It's key benefits include:
- Speed - Run commands faster than navigating the Azure portal.
- Scripting - Automate deployments in Bash, PowerShell, or pipelines.
- Portability - Works across Linux, macOS, and Windows.
- Consistency - Unified commands with clean, repeatable and predictable output.
The How
1.Install Azure CLI
Azure CLI can be installed by heading over to Microsoft’s official guide and choosing your OS to see the instructions for your OS. On Windows, the easiest way is to install via winget.
winget install --id Microsoft.AzureCLIWhichever method or OS you choose, the installation can be verified by outputting the version installed. All commands start with az.
az version
2.Log In
Before trying to run any commands, we need to connect to my Azure tenant. A browser window appears and I enter my credentials to authenticate to my Azure account.
az login --tenant <tenantID>
For those of you not used to using the command line, don't worry, the format of commands is quite straight forward:
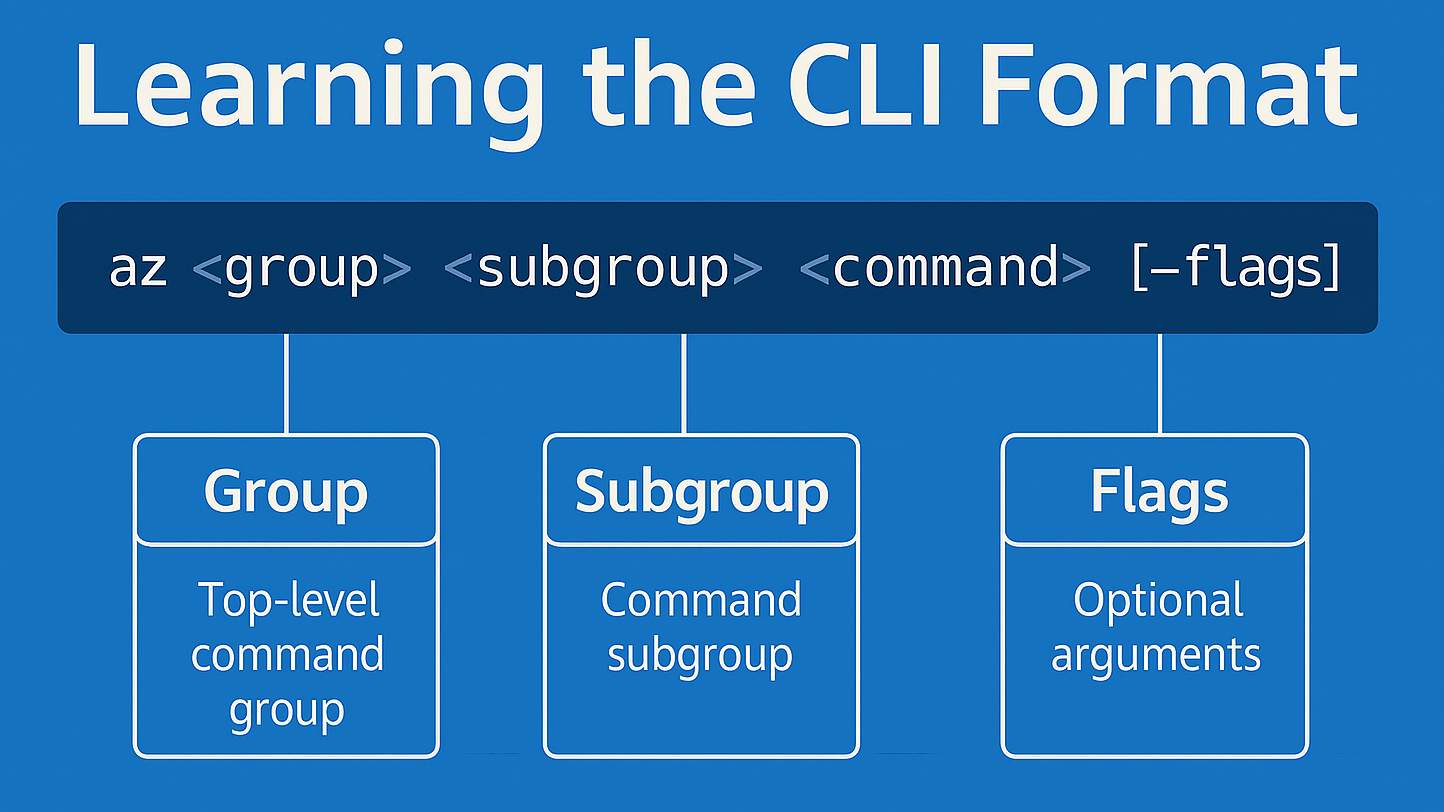
3.Create a Resource Group
Resources in Azure live in resources groups, so I set that up first using uksouth as the nearest location to me.
az group create `
  --name MyResourceGroup `
  --location uksouth
Once the command has completed successfully, we can use the list command to list all groups. The --output flag is useful to format the results shown on screen, I prefer the table view output.
az group list --output table
4.Create a private VNet and Subnet
Now let’s build a virtual network and a subnet for the Windows Server.
az network vnet create `
  --name MyVNet `
  --resource-group MyResourceGroup `
  --location uksouth `
  --address-prefix 10.0.0.0/16 `
  --subnet-name MySubnet `
  --subnet-prefix 10.0.1.0/24
5.Deploy a Windows Server VM
When creating the virtual machine, I used the Win2022DataCenter image. You can list the images available by running the command az vm image list --publisher MicrosoftWindowsServer --location uksouth --offer WindowsServer --output table
I also used the VM size of Standard_D2s_v3. You can check which VM sizes are available in your region by running the command az vm list-sizes --location uksouth --output table | Select-String "Standard_D2"
Since I don't need an NSG or public IP address for this VM, I use double quotes wrapped in single quotes.
az vm create `
  --name MyWinVM `
  --resource-group MyResourceGroup `
  --image Win2022DataCenter `
  --vnet-name MyVNet `
  --subnet MySubnet `
  --admin-username rajinder `
  --admin-password "LabUser12345" `
  --nsg '""' `
  --public-ip-address '""' `
  --size Standard_D2s_v3
6.Deploy Azure Bastion
I'll use Azure Bastion to connect to the VM in my private virtual network. First I create a public IP address named MyBastionIP.
az network public-ip create `
  --name MyBastionIP `
  --resource-group MyResourceGroup `
  --sku Standard `
  --location uksouth
Then I create the mandatory Bastion subnet that Azure requires with the required name AzureBastionSubnet and subnet address of 10.0.10.0/26.
az network vnet subnet create `
  --name AzureBastionSubnet `
  --resource-group MyResourceGroup `
  --vnet-name MyVNet `
  --address-prefix 10.0.10.0/26
Finally, I create Bastion. The enable-tunneling and enable-ip-connect are required when connecting to the VM using RDP from the Azure CLI.
az network bastion create `
  --name MyBastion `
  --resource-group MyResourceGroup `
  --location uksouth `
  --vnet-name MyVNet `
  --public-ip-address MyBastionIP `
  --enable-tunneling true `
  --enable-ip-connect true
7.Securely connect to the Windows Sever VM using RDP
Running this command opens a Remote Desktop session as if connecting to a local VM.
az network bastion rdp `
  --name MyBastion `
  --resource-group MyResourceGroup `
  --target-ip-address <VMprivateip>
8.Explore useful Azure CLI commands
Hopefully, you are now familiar with running CLI commands, here's some handy commands you can try as well.
To view your subscription:
az account show --output tableTo list resource groups:
az group list --output tableTo check VM status:
az vm list --show-details --output tableTo get IP info:
az vm list-ip-addresses `
  --name MyWinVM `
  --resource-group MyResourceGroup `
  --output table
To stop a VM:
az vm stop --resource-group MyResourceGroup --name MyWinVMThe Result
We installed Azure CLI, deployed a secure Windows Server VM inside a private network, and explored resource management without ever needing the Azure Portal. This is your first step to automating deployments in Azure!
Using a VPN is a secure and simple way to protect your data.
The Conclusion
Azure CLI puts cloud control in your hands, from provisioning infrastructure to automating deployments. Once you're comfortable with these basics, you can expand into scripting, containers, ARM templates, and advanced networking.
If you'd like to support my work, show your appreciation!


Comments ()