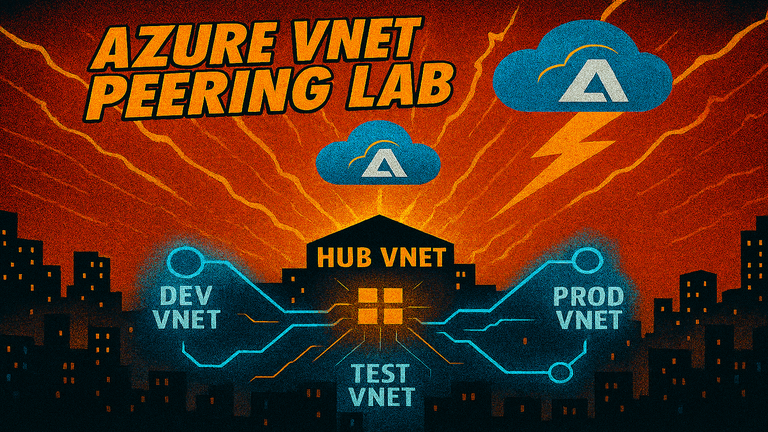
Azure VNET Peering Lab: Dev, Test, Prod with Hub-Spoke Topology
Setup isolated Dev, Test, and Prod environments using Azure VNet Peering and use a Hub VNet to centralise shared services and enforce network boundaries.
The Goal
Build an enterprise grade network topology complete with Dev, Test, and Prod VNets accessed securely through a jump host in the Hub VNet.
This lab is also available on YouTube
1: Create a Resource Group
Group all resources to keep your environment organised.
- Navigate to Resource Groups > + Create
- Set:
- Name:
rg-vnet-lab - Region:
UK South
- Name:
- Click Review + Create, then Create
2: Create Virtual Networks and Subnets
Create four isolated VNets for Hub, Dev, Test, and Prod. Each will have a single subnet with distinct address ranges. Use the table below when setting up each VNet.
Go to Virtual Networks > + Create for each one.
| VNet Name | Address Space | Subnet Name | Subnet Prefix |
|---|---|---|---|
vnet-dev | 10.0.0.0/16 | subnet-dev | 10.0.0.0/24 |
vnet-test | 10.1.0.0/16 | subnet-test | 10.1.0.0/24 |
vnet-prod | 10.2.0.0/16 | subnet-prod | 10.2.0.0/24 |
vnet-hub | 10.3.0.0/16 | subnet-hub | 10.3.0.0/24 |
3: Create VMs for testing connectivity
We’ll deploy one VM in each VNet. Only the Hub VM will have a public IP and allow SSH access (jump host). Spoke VMs remain private.
Use these settings in Virtual Machines > + Create for each VM:
| VM Name | VNet | Subnet | Public IP | VM Size | Auth Type | Inbound Ports |
|---|---|---|---|---|---|---|
vm-dev |
vnet-dev |
subnet-dev |
No | B2s | Password | None |
vm-test |
vnet-test |
subnet-test |
No | B2s | Password | None |
vm-prod |
vnet-prod |
subnet-prod |
No | B2s | Password | None |
vm-hub |
vnet-hub |
subnet-hub |
Yes | B2s | Password | 22 (SSH) |
4: Test connectivty before Peering
SSH into the Hub VM using its public IP. Then try to ping the private IPs of the Dev, Test, Prod VMs.
ping 10.0.0.4  # vm-dev
ping 10.1.0.4  # vm-test
ping 10.2.0.4  # vm-prod
Expected result:
Destination Host Unreachable
This confirms that the VNets are isolated and no connectivity exists yet.
5: Set up VNet Peering
For each connection:
- Go to Virtual Networks in the Azure Portal.
- Select
vnet-hub. - In the left-hand menu, Settings > Peerings
- Click + Add.
- Fill in the following:
- Peering link name (remote network):
dev-to-hub(ortest-to-hub,prod-to-hub) - Peering link name (local network):
hub-to-dev(orhub-to-test,hub-to-prod)
- Peering link name (remote network):
- Leave the default options ticked to allow access for both remote and local network.
- Click Add.
6: Test Connectivity After Peering
From inside vm-hub, ping spoke VMs private IPs again:
ping 10.0.0.4  # vm-dev
ping 10.1.0.4  # vm-test
ping 10.2.0.4  # vm-prod
This time you should get a response:
64 bytes from 10.0.0.4: icmp_seq=1 ttl=64 time=1.2 ms
You can also SSH into the spoke VMs from vm-hub:
ssh rajinder@10.0.0.4 # From within hub VM
Conclusion
We've now built a secure, scalable Azure networking lab with:
- Isolated VNets for Dev, Test, and Prod.
- A central Jump Host in the Hub for access.
- Security controls which ensure no external access to spoke VMs.
- VNet Peering to enable private traffic across VNets.
This setup mirrors real world designs used in production environments. To further secure these environments, you could add Network Security Group rules to control traffic and use Azure Bastion to access the Hub VM and remove the public IP.
Using a VPN is a secure and simple way to protect your data.


Comments ()